How to write a (very, very, very) simple dimetric 3D-display using ActionScript 3
2009-07-12
When expressing oneself in 3D there are lots and lots of frameworks and APIs, each of which having one or more drawbacks in terms of performance and/or portability (or availability, depending on the programming language/environment).
Regarding the web papervision was (and is) very helpfull. Still, one has to carry around a lot of code, which in some cases isn’t really needed. Plus the needs towards “real” 3D are not always there. Sometimes a simple dimetric display would do the job – but this needs to be “faked” within papervision, since it lacks an axonometric mode. Thus, on several occasions I ended up using a vast distance between the camera and the shown objects in combination with an equally big zoom to reduce perspective distortion.
Some projects really don’t need any advanced technique. No displacement- or bumpmapping, no texturing, no lighting, no translucency, etc. Just displaying coloured geometric primitives would suffice.
These simple geometric structures are made of planes, which in turn are made of lines, which are defined by points (speaking of a polygonal model). And there we are at the bottom, ready to go up again: The core class has to be a class describing a point within the three dimensional space.
package simple3D { class SpacePoint{ public var x:Number; public var y:Number; public var z:Number; public function SpacePoint (param_x:Number, param_y:Number, param_z:Number) { x = param_x; y = param_y; z = param_z; } }}This is pretty plain. We need three properties to define the position of the point within a 3D-space. The type of the variables must be Number, because we might want to tween the point using a nifty tweening class like the Caurina Tweener, for example.
A class defining a point in three dimensional space is all very well, but it would still be pointless if we can’t project the point to a two dimensional display like a screen. So let’s add a method for projection to our SpacePoint-class:
public function project ():Point { var x2D:Number = ORIGIN_X + x * X_INFLUENCE_BY_X + z * X_INFLUENCE_BY_Z ; var y2D:Number = ORIGIN_Y - y - x * Y_INFLUENCE_BY_X + z * Y_INFLUENCE_BY_Z ; return new Point(x2D,y2D); }Let’s have a closer look at this method. We need two numbers to define the projection of the 3D-point: x2D and y2D, which we will use to instantiate and return a 2D-Point, using the built-in class flash.geom.Point.
ORIGIN_X
and
ORIGIN_Y
are defining the position of the 3D-origin within the 2D-projection.
x
is simply the x-property of the SpacePoint which needs to be scaled with a factor
0 < X_INFLUENCE_BY_X < 1
because we do not want the x-axis of the 3D-space to be identical with the x-axis of the 2D-space.
z
is the z-property of the SpacePoint. It has no direct correspondent within the 2D-space, but it influences both x and y of the 2D-point.
The words written in uppercase are constants. They are identical for the projection of all our points, because we want all the points to reside in the same three dimensional space. The constants may be (and indeed are) declared static.
One of the advantages of this rather primitive looking approach is, that we can easily turn our dimetric projection into an isometric or any other axonometric projection by simply changing these constants before we compile the code.
Now that our SpacePoint class is ready to use let’s write some code for it.
var square_xy:Array = new Array();// creating and storing the 3D-points for a xy-squaresquare_xy.push( new SpacePoint( 0, 0, 0 ) );square_xy.push( new SpacePoint( 0, 200, 0 ) );square_xy.push( new SpacePoint( 200, 200, 0 ) );square_xy.push( new SpacePoint( 200, 0, 0 ) );
The code above simply instantiates an array and fills it with four SpacePoints. Since we now have a bunch of points neatly wrapped up inside an array, let’s write a function which takes the points and connects them:
// we might want to be able to define the colour of the lines // to be drawn. Let's add a colour-parameter: private function connect_points( points:Array, colour:Number ):void{ var last_point:Point = points[ points.length - 1 ].project(); var start_x:Number = last_point.x; var start_y:Number = last_point.y; // moving the drawing positioning to the last point. // this is simply for the sake of convenience - this way // we can simply loop through our array and call the // lineTo-method, without need for a an if-clause: graphics.moveTo( start_x, start_y ); graphics.lineStyle( 1, colour ); // actually connecting the dots: for each ( var p3D:SpacePoint in points ) { var point_2D:Point = p3D.project(); graphics.lineTo( point_2D.x, point_2D.y ); } }Since the Main class must extend the Sprite class (or MovieClip class) in Action Script 3 we can use the drawing-API of the Main class directly to connect our points.
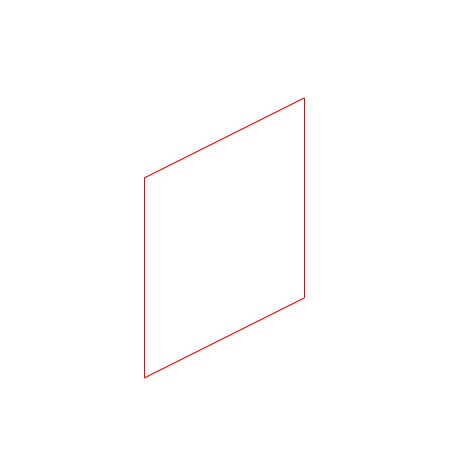
Adding a functioncall to our Main class like this:
connect_points( square_xy, 0xFF0000 );
… and compiling the code, the result looks like this:
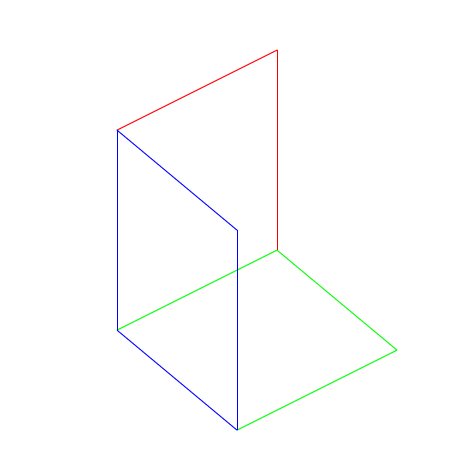
Let’s have some more squares to get a better idea of our chosen projection method:
// Omne trinum perfectum: var square_xy:Array = new Array(); var square_xz:Array = new Array(); var square_yz:Array = new Array(); // creating and storing the 3D-points for a xy-square square_xy.push( new SpacePoint( 0, 0, 0 ) ); square_xy.push( new SpacePoint( 0, 200, 0 ) ); square_xy.push( new SpacePoint( 200, 200, 0 ) ); square_xy.push( new SpacePoint( 200, 0, 0 ) ); // creating and storing the 3D-points for a xz-square square_xz.push( new SpacePoint( 0, 0, 0 ) ); square_xz.push( new SpacePoint( 0, 0, 200 ) ); square_xz.push( new SpacePoint( 200, 0, 200 ) ); square_xz.push( new SpacePoint( 200, 0, 0 ) ); // creating and storing the 3D-points for a yz-square square_yz.push( new SpacePoint( 0, 0, 0 ) ); square_yz.push( new SpacePoint( 0, 0, 200 ) ); square_yz.push( new SpacePoint( 0, 200, 200 ) ); square_yz.push( new SpacePoint( 0, 200, 0 ) ); // actually drawing the square-outlines in different colours connect_points( square_xy, 0xFF0000 ); connect_points( square_xz, 0x00FF00 ); connect_points( square_yz, 0x0000FF );
And here is the rendering on the screen:
That’s it – we have a means to create a projection. Still, the code (zip including a compiled swf) creates only one image and doesn’t update it.
To achive a kind of animated projection we would need to implement some further functionality – e.g. a function to clear and redraw the display, which could be implemented as a “Listener” (AS-Jargon for objects following the Observer-Pattern) of an ENTER_FRAME-Event.
It would also be nice to have a method measuring the distance from a point to the image plane, plus a function to sort the 3D-Objects depending on their distance to it (thus implementing a realistic overlapping).
As mentioned above, I strongly recommend the Caurina Tweener for programmatical animation, which in my opinion offers all the functionality programmatical animation needs.
P.S.: If you’re interested in the classical method of displaying three dimensional objects within a two dimensional space (read: drawing), you’ll find a a pretty good online guide at handprint.com.


